
Tech Note 1021 – Accessing the Graphic User Interface (GUI)
Scout 85.2 and above
- Description:
This note is to assist users in accessing the Graphic User Interface (GUI). Note that this feature is only available in 85.2 firmware and above.
- Implementation:
- Setting Controller IP Settings
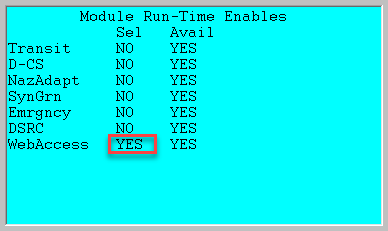
The first step is to go to MM-8-4 and select “Run Options.” On the right side all modules licensed to the user will show “Yes” if available. Scroll down until you see “WebAccess.” It should show that it is an available module. Under the Select (Sel) column, change the “WebAccess” status from “No” to “Yes.”
Note: After enabling a license, the controller will require a reboot. Once the status of any module is changed wait roughly 18 seconds then reboot the controller.

Once the license has been enabled go to MM-6-5 and set the IP information for the controller.

If the controller and the PC are within the same network the user should be able to access the controller at this point.
- Accessing Through Web Browser
If connected to the same network as the controller, open any web browser and input the IP address of the desired device.
Once connected to the controller, the user can then access the GUI enabling them to check real-time status and apply database changes.

Status: MM-7-1

Phase Timing: MM-1-1-1

- Connecting Directly to Controllers
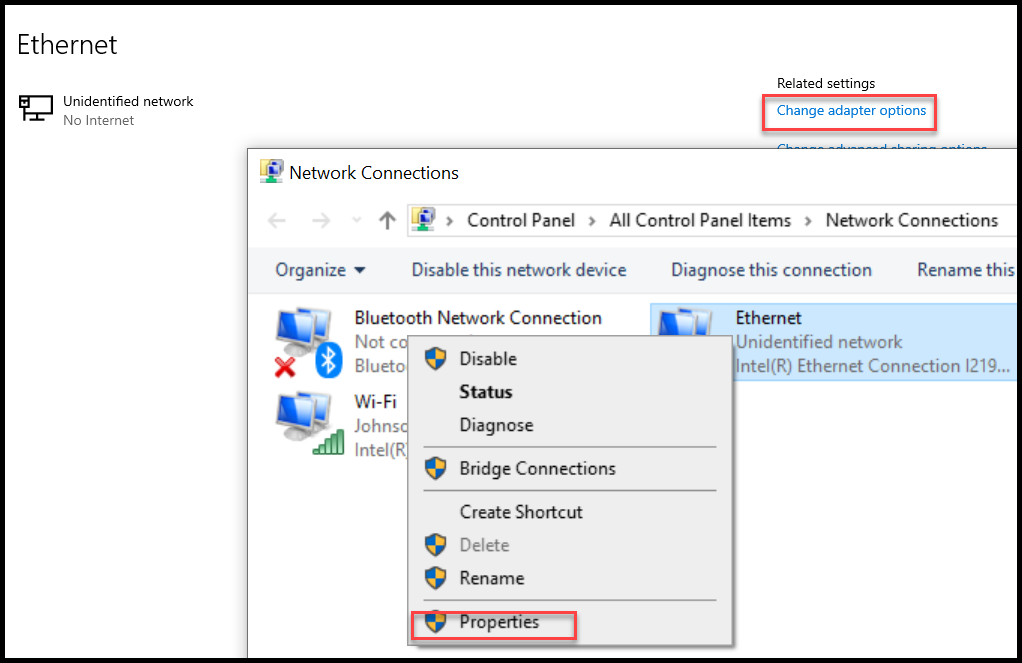
Connect an ethernet from your PC to the controller. Open your ethernet settings on your PC and select “change adaptor options.” Right click the unidentified ethernet connection and select “properties.”
Right click “Internet Protocol Version 4 (TCP/IPv4)” and set the PC ethernet port to the same IP scheme.
Note: For best results change the fourth octet within 10 digits of the controller IP.
THE PC AND CONTROLLER CANNOT HAVE MATCHING IP ADDRESSES


After this step, access through the web browser as discussed in section 2.
- Troubleshooting Connection Issues
When attempting to connect, it is possible that the user will see a grayed-out screen followed by the loading circle after navigation.


This means there is a path but connection services are being blocked. There are two main areas to check:
- Make sure the “Webaccess” has been enabled under MM-8-4-2.
- Check to see if any other user is logged into that specific controller. Only one user can access the GUI at any given time.
- Verify that TCP ports 8080 and 4444 are allowed throughout any network path between the browser machine and the controller. Port 8080 is used from the browser to load the web interface. Port 4444 is used internally by the web interface application to get real-time data from the controller.